Saturday, 29 November 2014

File Shares In Windows Server 2012


File and Storage Role is installed by default in Windows Server 2012. This means you can create a file share with a very minimal amount of work on a brand new server. To get started, as with many things regarding Server 2012, open Server Manager.
From Server Manager, click on File and Storage Services in the Server Manager sidebar. Then click on Shares. From the Shares screen, click on the Shares drop-down list and then click on New Share.
This will open the New Share Wizard. From here, select a type of share. For the purposes of this article, we’ll create a very basic SMB share, so click on “SMB Share – Quick.” Then click on the Next button.
At the Share Location screen, I like to click on “Type a custom path” and then click on the Browse button.
At the Select Folder screen, browse to the folder you’d like to share out and then click on the Select Folder button. Then click on Next back at the Share Location screen.
At the Share Name screen of the New Share Wizard, enter the name you want users to see when accessing the share in the Share Name field and the description (if any) that users will see in the screen when connecting to the share. You’ll also see the local path used to connect to that share on the server as well as the path that will be used to connect remotely in this screen. Click Next once you’ve entered the information.
At the Other Settings screen, you have 4 options (checkboxes):
  • Enable Access Based Enumeration: If you have Mac clients this is often a bad idea. This feature ends up not showing people objects they don’t have access to. It’s great in a purely Windows environment, thought.
  • Allow Caching of Share: Allows Windows clients to right-click on a share and choose to cache it.
  • Enable Branch Cache on the File Server: Allows a computer in a branch office to act as a Branch Cache server/workgroup server.
  • Encrypt data access: Encrypts traffic to the share.
Most of these options are pretty irrelevant to the Mac and Linux, but can be helpful in purely Windows environments, especially if you need additional security or want your users caching data from the share. Once you’ve chosen the options that best work for you, click Next.
At the Permissions screen, choose who has access to connect to the share. Note that controlling permissions to access objects from inside the share is done separately through the share and this option is just used to configure who can mount/map to the share. Click Next once only the users you want to access the share have the appropriate level of access.
At the Confirmation screen, verify that all the settings for the share are correct and then click on the Create.
Once the share is created, click on Close button.
Then connect to the share and verify that the settings are as appropriate. Once done, create the subdirectories for the root level and configure permissions as appropriate.

Use Public Yum Server for Oracle Linux


There is no yum repository in Oracle Linux after installation,
so it's necessarry to set it in order to update the system with yum command.
Oracle provides public yum server and we can use it for free to set.

⇒ Public Yum Server : http://public-yum.oracle.com/


Download repository like follows. (The example below is for Oracle Linux 6)


[root@dlp ~]# cd /etc/yum.repos.d
[root@dlp ~]# wget http://public-yum.oracle.com/public-yum-ol6.repo

How to enable root user in Ubuntu


The root user in Ubuntu is disabled by default because his password is not set. But if you'd like to use root user by some reason, enable it like follows.

1) Set root password

sysstec@ubuntu:~$ sudo passwd root

Enter new UNIX password: # set root password

Retype new UNIX password: # confirm

passwd: password updated successfully
sysstec@ubuntu:~$ su -

Password: # root password

root@ubuntu:~# # just switched

The examples on this site show as a root user from now. If you use sudo, add "sudo" at the head of commands.


2) If you enable root, limit users to switch to root.

root@ubuntu:~# vi /etc/pam.d/su # line 15: uncomment and add a group that can switch to root

auth   required   pam_wheel.so   group=adm


root@ubuntu:~# usermod -G adm sysstec

Friday, 28 November 2014

Data Mining - Terminologies


Data Mining

Data Mining is defined as extracting the information from the huge set of data. In other words we can say that data mining is mining the knowledge from data. This information can be used for any of the following applications:
  • Market Analysis
  • Fraud Detection
  • Customer Retention
  • Production Control
  • Science Exploration

Data Mining Engine

Data mining engine is very essential to the data mining system.It consists of a set of functional modules. These modules are for following tasks:
  • Characterization
  • Association and Correlation Analysis
  • Classification
  • Prediction
  • Cluster analysis
  • Outlier analysis
  • Evolution analysis

Knowledge Base

This is the domain knowledge. This knowledge is used to guide the search or evaluate the interestingness of resulting patterns.

Knowledge Discovery

Some people treat data mining same as Knowledge discovery while some people view data mining essential step in process of knowledge discovery. Here is the list of steps involved in knowledge discovery process:
  • Data Cleaning
  • Data Integration
  • Data Selection
  • Data Transformation
  • Data Mining
  • Pattern Evaluation
  • Knowledge Presentation

User interface

User interface is the module of data mining system that helps communication between users and the data mining system. User Interface allows the following functionalities:
  • Interact with the system by specifying a data mining query task.
  • Providing information to help focus the search.
  • Mining based on the intermediate data mining results.
  • Browse database and data warehouse schemas or data structures.
  • Evaluate mined patterns.
  • Visualize the patterns in different forms.

Data Integration

Data Integration is data preprocessing technique that merges the data from multiple heterogeneous data sources into a coherent data store. Data integration may involve inconsistent data therefore needs data cleaning.

Data Cleaning

Data cleaning is a technique that is applied to remove the noisy data and correct the inconsistencies in data. Data cleaning involves transformations to correct the wrong data. Data cleaning is performed as data preprocessing step while preparing the data for a data warehouse.

Data Selection

Data Selection is the process where data relevant to the analysis task are retrieved from the database. Sometimes data transformation and consolidation are performed before data selection process.

Clusters

Cluster refers to a group of similar kind of objects. Cluster analysis refers to forming group of objects that are very similar to each other but are highly different from the objects in other clusters.

Data Transformation

In this step data are transformed or consolidated into forms appropriate for mining by performing summary or aggregation operations.

Data Mining Introduction


Introduction

There is huge amount of data available in Information Industry. This data is of no use until converted into useful information. Analysing this huge amount of data and extracting useful information from it is necessary.
The extraction of information is not the only process we need to perform, it also involves other processes such as Data Cleaning, Data Integration, Data Transformation, Data Mining, Pattern Evaluation and Data Presentation. Once all these processes are over, we are now position to use this information in many applications such as Fraud Detection, Market Analysis, Production Control, Science Exploration etc.

What is Data Mining

Data Mining is defined as extracting the information from the huge set of data. In other words we can say that data mining is mining the knowledge from data. This information can be used for any of the following applications:
  • Market Analysis
  • Fraud Detection
  • Customer Retention
  • Production Control
  • Science Exploration

Need of Data Mining

Here are the reasons listed below:
  • In field of Information technology we have huge amount of data available that need to be turned into useful information.
  • This information further can be used for various applications such as market analysis, fraud detection, customer retention, production control, science exploration etc.

Data Mining Applications

Here is the list of applications of Data Mining:
  • Market Analysis and Management
  • Corporate Analysis & Risk Management
  • Fraud Detection
  • Other Applications

Market Analysis and Management

Following are the various fields of market where data mining is used:
  • Customer Profiling - Data Mining helps to determine what kind of people buy what kind of products.
  • Identifying Customer Requirements - Data Mining helps in identifying the best products for different customers. It uses prediction to find the factors that may attract new customers.
  • Cross Market Analysis - Data Mining performs Association/correlations between product sales.
  • Target Marketing - Data Mining helps to find clusters of model customers who share the same characteristics such as interest, spending habits, income etc.
  • Determining Customer purchasing pattern - Data mining helps in determining customer purchasing pattern.
  • Providing Summary Information - Data Mining provide us various multidimensional summary reports

Corporate Analysis & Risk Management

Following are the various fields of Corporate Sector where data mining is used:
  • Finance Planning and Asset Evaluation - It involves cash flow analysis and prediction, contingent claim analysis to evaluate assets.
  • Resource Planning - Resource Planning It involves summarizing and comparing the resources and spending.
  • Competition - It involves monitoring competitors and market directions.

Fraud Detection

Data Mining is also used in fields of credit card services and telecommunication to detect fraud. In fraud telephone call it helps to find destination of call, duration of call, time of day or week. It also analyse the patterns that deviate from an expected norms.

Other Applications

Data Mining also used in other fields such as sports, astrology and Internet Web Surf-Aid.

Wednesday, 26 November 2014

DB2 - Server Installation


DB2 - Server Installation


Introduction

You can download the DB2 Server trial version or purchase the product license from www.ibm.com. There are two separate DB2 servers available for downloading, depending upon the size of operating system, on which it is intended to execute. For example, if you want to download a DB2 server for 32bit Linux or UNIX operating system, then you need to download a 32 bit DB2 server. The same applies for 64bit DB2 server.
Hardware requirements

Processor : Minimum Core 2Duo
Ram : 1GB minimum
Hard disk : 30GB minimum

Software requirements

Before installing the DB2 server, your system needs to get ready with the required software on it. For Linux, you need to install “libstdc++6.0”.

Checking system compatibility

Before installing DB2 Server, you need to verify if your system is compatible with the DB2 server. For confirming the compatibility, you need to call 'db2prereqcheck' command on command console.
Installing DB2 on Linux operating system

Open the Terminal and set the db2 installation image folder path on console using “CD <DB2 installation folder>” command. Then type “./db2prereqcheck” command, which confirms the compatibility of your system with DB2 server.
./db2prereqcheck
Figure-1 shows the compatibility requirements of Linux operating system and hardware system.
Follow the given steps for installing DB2 on your Linux system:
  • Open the terminal.
  • Login as root user.
  • Open DB2 Installation folder.
  • Type “./db2setup” and press Enter.
This process will start execution of DB2 server setup.
DB2 Server Setup
Type “./db2setup” and press Enter on root terminal to start setup process of DB2 Server.
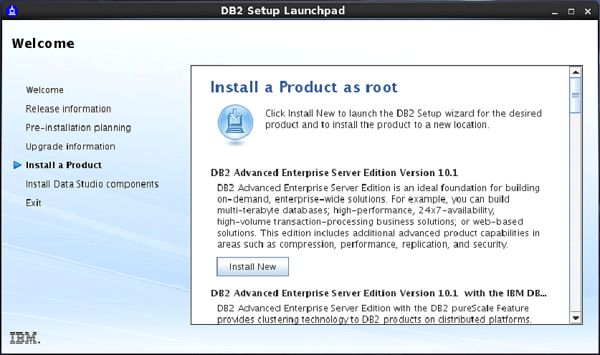
On doing so, the “Set up Launch Pad” screen appears. [Figure-2]
Set up Launch Pad
On Setup Launch pad page, select “Install a Product” option from left side menu. Select option “DB2 Advanced Enterprise Server Edition”. Select “Install New” Button.
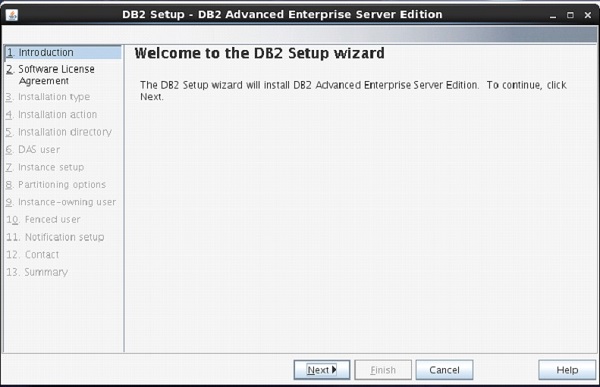
A new frame appears with name “DB2 setup wizard”. Click “Next”. [Figure-3]
DB2 setup wizard
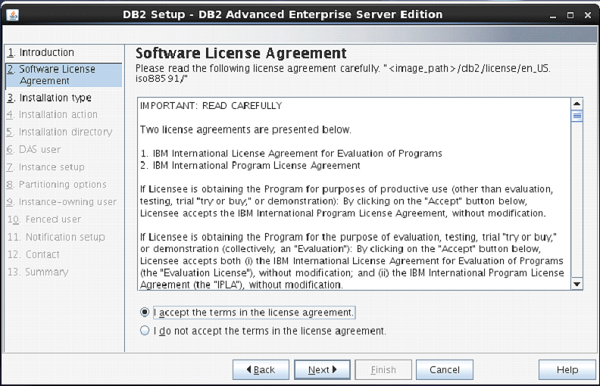
The next screen appears with DB2 license agreement. Select “I accept the terms…” Click “Next”. [Figure-4]
DB2 license agreement
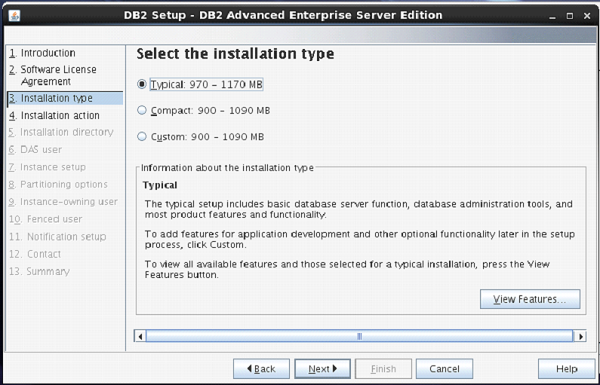
Next screen comes up with offer of Installation type, which is set to “Typical” by default.
Keep the same selection. Click “Next”. [Figure-5]
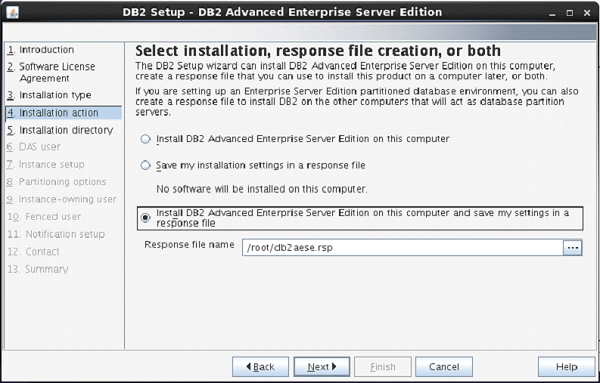
Installation Action
The next screen appears with installation action.
Select “Install DB2 Advanced Enterprise Server Edition…”
Click “Next”. [Figure-6]
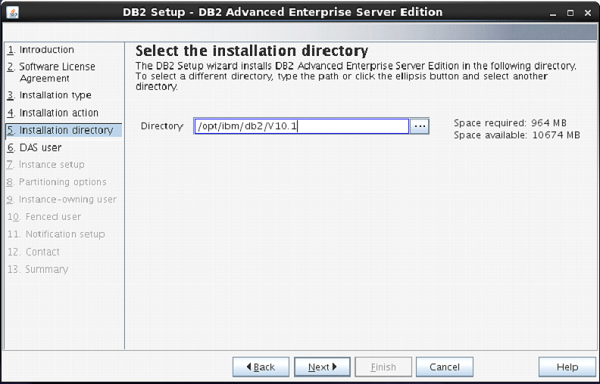
Installation Directory
On the next screen, the setup program asks for selection of installation directory.
Keep the default and click “Next”.
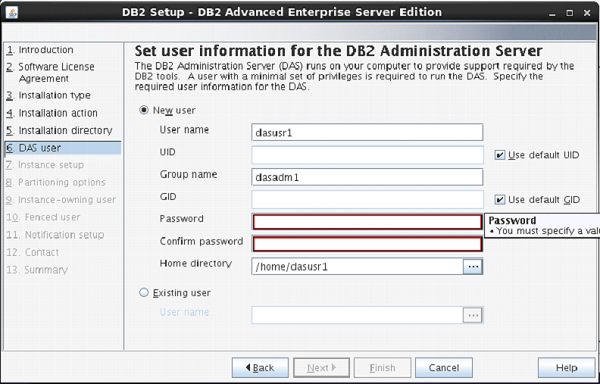
Server Info
The next screen comes up with the user authentication. Enter your password for “dasusr1” user.
(Your password can be identical to username so that it is convenient to remember.)
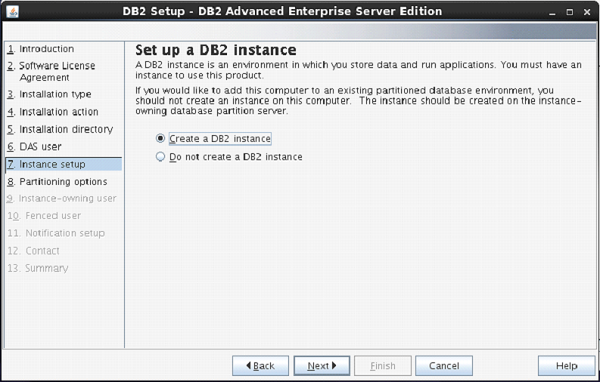
DB2 Instance
On the following screen, the setup asks you for creation of DB2 Server Instance.
Here, it is creating a DB2 instance with name “db2inst1”.
DB2 Instance Name
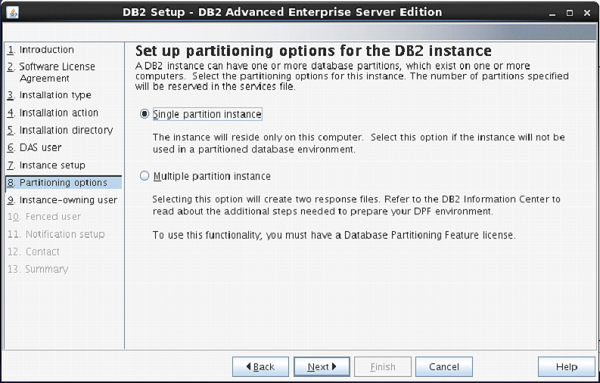
The next screen asks you the number of partitions you require for your default instance.
You have a choice of “single or Multiple” partitions.
Select “single partition instance”. Click “next”.
DB2 Partition
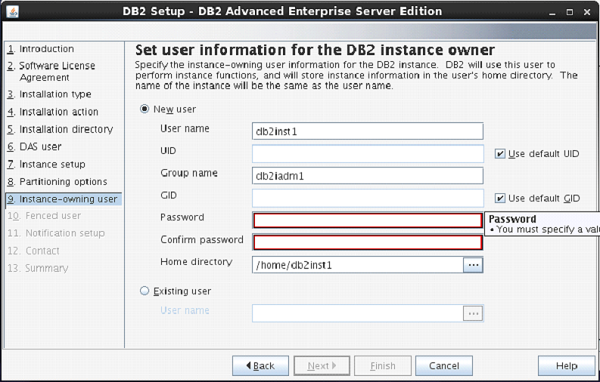
On the next screen, the setup asks you for authentication for DB2 instance being created.
Here, by default username is created as “db2inst1”. You can enter password same as username.
Click “Next”.
Authentication
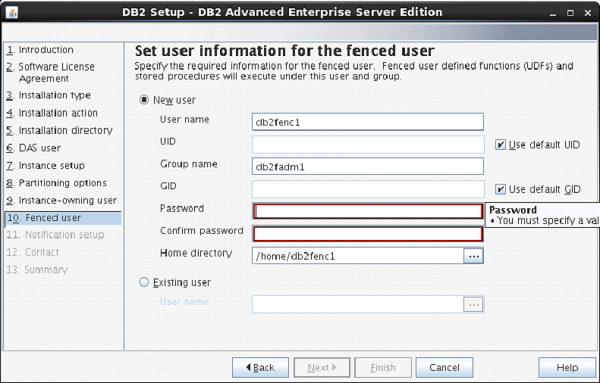
On the next screen, the setup asks to enter authentication information for “db2fenc” user.
Here, you can enter password same as username.
Click “Next”.
Authentication Information
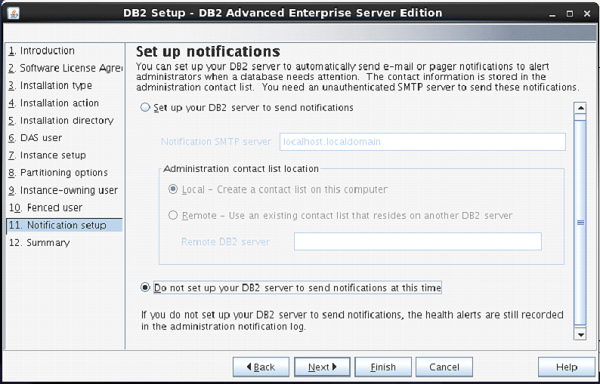
On the next screen, you can select “Do not setup your db2 server to send notifications at this time” option.
Click ”Next”.
Notification
The next screen shows you the information about db2 setup.
Click “Finish”.
The DB2 Installation procedure is complete at this stage.

Verifying DB2 installation

You need to verify the installation of DB2 server for its usefulness. On completing the DB2 Server installation, logout from current user mode and login to “db2inst1” user. In “db2inst1” user environment, you can open terminal and execute the following commands to verify if your db2 product is installed properly or not.

db2level

This command shows the current version and service level of the installed DB2 product for current instance.
Syntax:
db2level 
Example:
db2level 
Output:
DB21085I Instance "db2inst2" uses "64" bits       
And DB2 code release "SQL10010" with level     
identifier "0201010E". Informational tokens     
are "DB2 v10.1.0.0", "s120403",     
"LINUXAMD64101", and Fix Pack "0".  
Product is installed at "/home/db2inst2/sqllib".  

db2licm

This command shows all the license related information of our DB2 Product.
Syntax:
db2licm <parameter> 
Example:
db2licm -l 
Output:
Product name:                     "DB2 Advanced Enterprise Server Edition" 
License type:                     "Trial" 
Expiry date:                      "10/02/2014" 
Product identifier:               "db2aese" 
Version information:              "10.1"  
Product name:                     "DB2 Connect Server" 
License type:                     "Trial" 
Expiry date:                      "10/02/2014" 
Product identifier:               "db2consv" 
Version information:              "10.1" 

Command Line Processor (CLP)

The CLP can be started in one of the three modes:
  1. Command mode: In this mode, each command and SQL statement must be prefixed by “db2”. For example, query “db2 activate database sample”.
  2. Interactive input mode: you can launch this mode by using the “db2” command. Here, you can pass SQL statements without prefix. For example, “activate database sample”.
  3. Batch mode: Here, you need to create a script file, which contains all SQL queries of requirements and save the file with “.db2” extension. You can call this in command line using syntax “db2 –tf <filename.db2>”.

DB2 - Introduction


DB2 - Introduction


Overview

DB2 is a database product from IBM. It is a Relational Database Management System (RDBMS). DB2 is designed to store, analyze and retrieve the data efficiently. DB2 product is extended with the support of Object-Oriented features and non-relational structures with XML.

History

Initially, IBM had developed DB2 product for their specific platform. Since year 1990, it decided to develop a Universal Database (UDB) DB2 Server, which can run on any authoritative operating systems such as Linux, UNIX, and Windows.

Versions

For IBM DB2, the UDB current version is 10.5 with the features of BLU Acceleration and its code name as 'Kepler'. All the versions of DB2 till today are listed below:
Version
Code Name
3.4
Cobweb
8.1, 8.2
Stinger
9.1
Viper
9.5
Viper 2
9.7
Cobra
9.8
It added features with Only PureScale
10.1
Galileo
10.5
Kepler

Data server editions and features

Depending upon the requirement of needful features of DB2, the organizations select appropriate DB2 version. The following table shows DB2 server editions and their features:
Editions
Features
Advanced Enterprise Server Edition and Enterprise Server Edition (AESE / ESE)
It is esigned for mid-size to large-size business organizations. Platform - Linux, UNIX, and Windows. Table partitioning High Availability Disaster Recovery (HARD) Materialized Query Table (MQTs) Multidimensional Clustering (MDC) Connection concentrator Pure XML Backup compression Homogeneous Federations
Workgroup Server Edition (WSE)
It is designed for Workgroup or mid-size business organizations. Using this WSE you can work with - High Availability Disaster Recovery (HARD) Online Reorganization Pure XML Web Service Federation support DB2 Homogeneous Federations Homogeneous SQL replication Backup compression
Express -C
It provides all the capabilities of DB2 at zero charge. It can run on any physical or virtual systems with any size of configuration.
Express Edition
It is designed for entry level and mid-size business organizations. It is full featured DB2 data server. It offers only limited services. This Edition comes with - Web Service Federations DB2 homogeneous federations Homogeneous SQL Replications Backup compression
Enterprise Developer Edition
It offers only single application developer. It is useful to design, build and prototype the applications for deployment on any of the IBM server. The software cannot be used for developing applications.

Tuesday, 25 November 2014

What is Operating System ?


It is a program with following features:
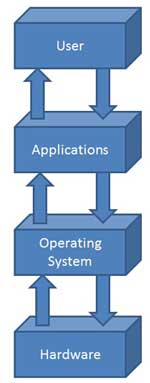
  • An operating system is a program that acts as an interface between the software and the computer hardware.
  • It is an integrated set of specialised programs that are used to manage overall resources and operations of the computer.
  • It is specialised software that controls and monitors the execution of all other programs that reside in the computer, including application programs and other system software.

Objectives of Operating System

  • To make a computer system convenient to use in an efficient manner
  • To hide the details of the hardware resources from the users
  • To provide users a convenient interface to use the computer system
  • To act as an intermediary between the hardware and its users and making it easier for the users to access and use other resources
  • To manage the resources of a computer system
  • To keep track of who is using which resource, granting resource requests, according for resource using and mediating conflicting requests from different programs and users
  • To provide efficient and fair sharing of resources among users and programs
Operating System

Characteristics of Operating System

  • Memory Management -- keeps tracks of primary memory i.e. what part of it is in use by whom, what part is not in use etc. and allocates the memory when a process or program requests it.
  • Processor Management -- allocates the processor(CPU) to a process and deallocates processor when it is no longer required.
  • Device Management -- keeps track of all devices. This is also called I/O controller that decides which process gets the device, when, and for how much time.
  • File Management -- allocates and de-allocates the resources and decides who gets the resources.
  • Security -- prevents unauthorized access to programs and data by means of passwords and similar other techniques.
  • Job accounting -- keeps track of time and resources used by various jobs and/or users.
  • Control over system performance -- records delays between request for a service and from the system.
  • Interaction with the operators -- The interaction may take place via the console of the computer in the form of instructions. Operating System acknowledges the same, does the corresponding action and informs the operation by a display screen.
  • Error-detecting aids -- Production of dumps, traces, error messages and other debugging and error-detecting methods.
  • Coordination between other software and users -- Coordination and assignment of compilers, interpreters, assemblers and other software to the various users of the computer systems.

Types of Computer


Computers can be broadly classified by their speed and computing power.

Sr.No.
Type
Specifications
1
PC (Personal Computer)
It is a single user computer system having moderately powerful microprocessor
2
WorkStation
It is also a single user computer system which is similar to personal computer but have more powerful microprocessor.
3
Mini Computer
It is a multi-user computer system which is capable of supporting hundreds of users simultaneously.
4
Main Frame
It is a multi-user computer system which is capable of supporting hundreds of users simultaneously. Software technology is different from minicomputer.
5
Supercomputer
It is an extremely fast computer which can execute hundreds of millions of instructions per second.

PC (Personal Computer)

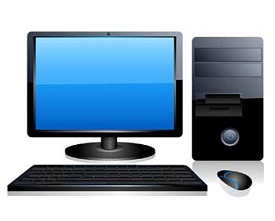
A PC can be defined as a small, relatively inexpensive computer designed for an individual user. PCs are based on the microprocessor technology that enables manufacturers to put an entire CPU on one chip. Businesses use personal computers for word processing, accounting, desktop publishing, and for running spreadsheet and database management applications. At home, the most popular use for personal computers is playing games and surfing Internet.
Although personal computers are designed as single-user systems, these systems are normally linked together to form a network. In terms of power, now-a-days High-end models of the Macintosh and PC offer the same computing power and graphics capability as low-end workstations by Sun Microsystems, Hewlett-Packard, and Dell.
Personal Computer

Workstation

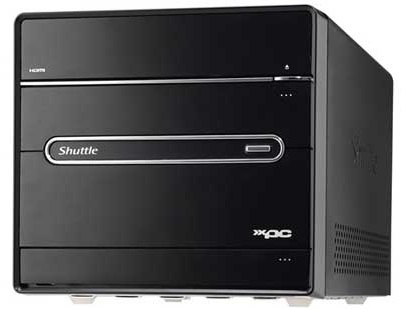
Workstation is a computer used for engineering applications (CAD/CAM), desktop publishing, software development, and other such types of applications which require a moderate amount of computing power and relatively high quality graphics capabilities.
Workstations generally come with a large, high-resolution graphics screen, large amount of RAM, inbuilt network support, and a graphical user interface. Most workstations also have a mass storage device such as a disk drive, but a special type of workstation, called a diskless workstation, comes without a disk drive.
Common operating systems for workstations are UNIX and Windows NT. Like PC, Workstations are also single-user computers like PC but are typically linked together to form a local-area network, although they can also be used as stand-alone systems.
Work Stations

Minicomputer

It is a midsize multi-processing system capable of supporting up to 250 users simultaneously.
Mini Computer

Mainframe

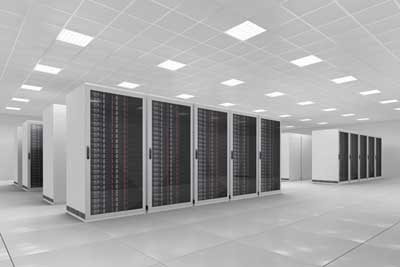
Mainframe is very large in size and is an expensive computer capable of supporting hundreds or even thousands of users simultaneously. Mainframe executes many programs concurrently and supports many simultaneous execution of programs
Main Frame

Supercomputer

Supercomputers are one of the fastest computers currently available. Supercomputers are very expensive and are employed for specialized applications that require immense amount of mathematical calculations (number crunching). For example, weather forecasting, scientific simulations, (animated) graphics, fluid dynamic calculations, nuclear energy research, electronic design, and analysis of geological data (e.g. in petrochemical prospecting).

VNC Server in CentOS 7


 VNC Server in CentOS 7


Install VNC Server to connect with GUI from remote client.

[1] Install VNC Server to operate Server with GUI remotely from Windows client.

[root@dlp ~]# yum -y install tigervnc-server
[root@dlp ~]# su - sysstec

# switch to a user you'd like to config VNC

[cent@dlp ~]$ vncpasswd        # set VNC password

Password:                           # input

Verify:                                # confirm

# run with diplay number '1', screen resolution '800x600', color depth '24'

[sysstec@dlp ~]$ vncserver :1 -geometry 800x600 -depth 24

[2]   Install VNC viewer on client computer next. Download from the site below to install UltraVNC.

http://www.uvnc.com/downloads/ultravnc.html

After installing UltraVNC, click "UltraVNC Viewer" to run, then, following screen is shown. Input [(Server's hostname or IP address):(display number)] like following example and then click "Connect" button.


[3]     Password is required. Input VNC password you set in the section [1].


[4]     Just connected.


Types of Data Backup


Types of Data Backup
After you have determined what to back up and what backup storage media fits the best, you need to decide how the files will be processed. The main things to think about here are the method of backup and compression options.
Normally, file backup software doesn’t back up your PC as a whole, but allows forming tasks involving variable sets of folders and files. For each backup task, for convenience in operation, the program creates a so-called index file which contains information about all data used in it. This file is then used for comparing current and old data when doing differential or incremental backups. Let's take a look at examples of different methods.
Full Data Backup
Full backup assumes that each time you execute the task, the entire set of data is copied to the chosen place. This type of backup takes the most disk space, time and PC resources, and often does a lot of senseless work (because unchanged, already backed up data becomes multiplied several times). On the other hand, for some types of data, e.g. when you create a complete disk image backup, full backup is the only effective option.
Incremental Data Backup
Incremental backup processes only files that appeared or changed since the previous backup. Say, you created a task for backing up My Documents folder. If you do an incremental backup immediately after a full backup, no files will be copied. But as soon as some files get modified, or new files are created, an incremental backup will process all modifications (which are calculated through comparing data in the index file with the current situation on the drive).
Incremental backups may be of two types: when files are rewritten in the same folder where the full backup is and when files are put into separate folders (which leads to creation of multiple instances of the same files). In Handy Backup, the latter option is called backup with timestamps.
Differential Data Backup
Differential backup is very much like incremental backup, with the only difference that it doesn’t update the index file with each task execution, and therefore each task execution processes all modifications since the last full backup. This approach requires more disk space, as each differential backup is of the same size or larger than the previous one, but enables faster restoration of data, as compared to incremental backup.
Data Compression Options
Since data backups are not meant to be used as separate documents, it's wise to enable automatic compression, in order to save storage space and transferring time (may be important if you back up online, or back up to FTP locations). Here you need to decide, if you want to compress the backup set as a whole, or compress each individual file. The first variant gives the best results in terms of saving space, while the second one requires less PC resources and allows you to perform backups and restoration faster.
After choosing a backup type, it is important to choose how often the task will be performed, and specify a backup schedule.